Input Images
Intro
Images are the main input data to SURE, next to the corresponding orientation file(s) and (optionally) LiDAR data. There are two ways in which SURE uses the Input Images to generate products:
Geometric reconstruction of 3D surfaces
Generation of Colored Point Clouds, True Orthos and Textured Meshes
Supported Camera Model
SURE can process Digital Frame Images based on the Pinhole Camera Model and supports various lens distortion models. See also additional information about the projection geometry.
Supported Image Formats
The supported image formats are tif, mrf, png and jpg.
tif and png can be supplied in 8 bit or 16 bit; jpg only supports 8 bit.
Image files can contain up to 4 channels, typically Red, Green, Blue (+ optionally Infrared).
Image Quality
The quality of the Image content is crucial for obtaining optimal results. High quality texture implies the possibility to distinguish details, down to the pixel local context. Avoid underexposure to achieve a good signal to noise ratio in the image. Images can be very lightly denoised and sharpened, however should not remove signal in the texture on the pixel level. Color, brightness and contrast adjustment do not affect the matching result negatively.
In addition to this, having sufficient coverage and redundancy is also important for obtaining a complete and accurate surface reconstruction. More information about this is available at Image Quality and Image Acquisition and Overlap.
SURE supports the use of image files with LZW, Deflate or JPEG compression. Avoid using strongly compressed images. These can increase the risk of compression artifacts that reduce the quality of reconstruction.
If enabled, SURE applies corrections in the color space, affecting exclusively the texture of output products. See more information about this in the Image Processing Features article.
Interface
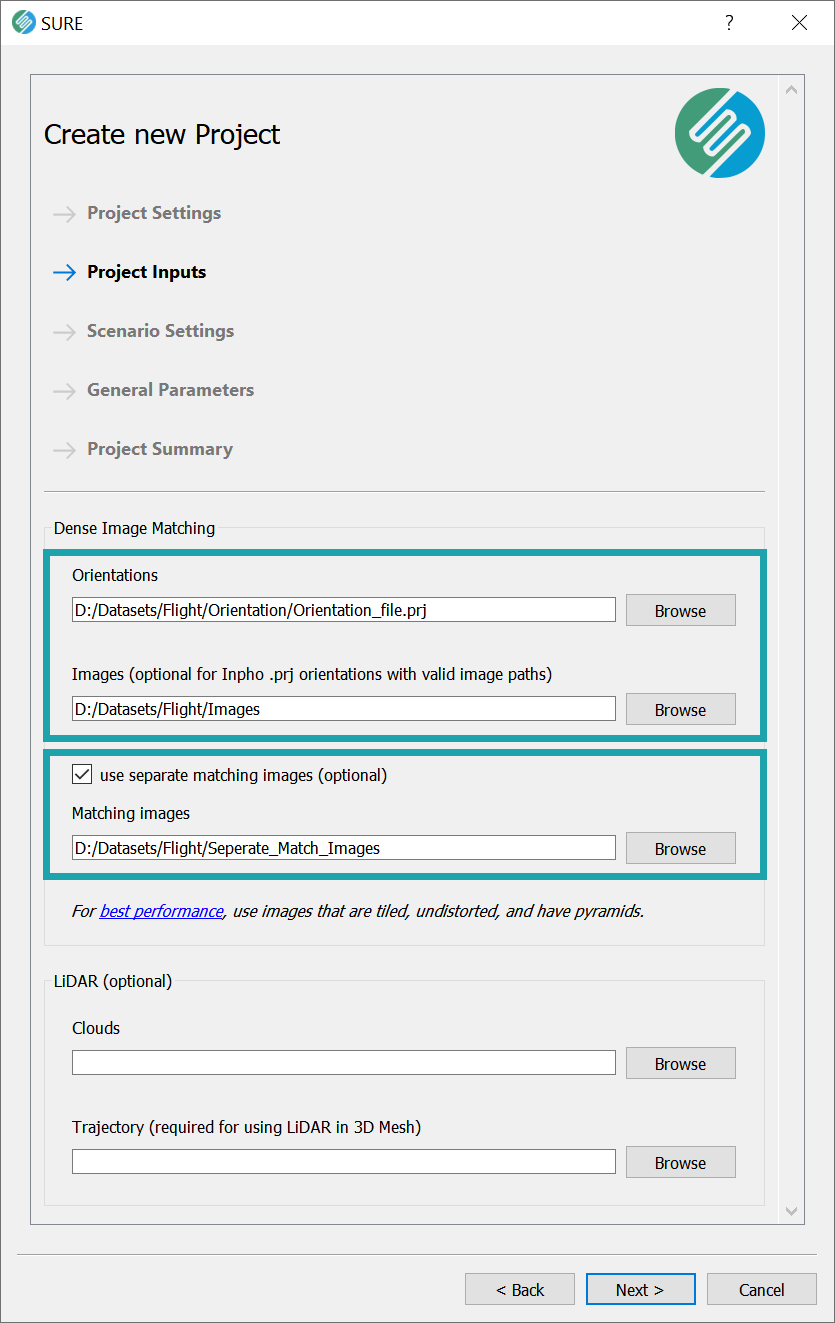
Input Images may be specified in one of these ways:
A folder directly containing the image files (not in sub-directories),
A *.txt list containing the absolute or relative file path to each input image in a new line (e.g. use case: image files are spread throughout various directories or using only a subset of images).
By default, SURE will use the specified Input Images for geometric reconstruction of 3D surfaces and for applying texture on Point Clouds, True Orthos and Textured Meshes.
The user also has the possibility to specify separate Matching Images which will be used exclusively for the surface reconstruction (e.g. for Dense Matching). In this situation, it is still necessary to specify the Input Images which will be used for the texturing. There must be a direct correspondence (pixel to pixel) between the Matching Images and the Texture Images. Consequently, the file names should correspond to the same orientation identifier.
The Input Images are specified during the Project Configuration wizard or using the corresponding CLI arguments:
-i, --images <path>              Set path to input images (required, optional for
                                 certain orientation formats with valid image
                                 paths)
--matching-images <path>         Set path to separate input images for matching
Image Preparation
The Image Preparation step makes sure that the input imagery can be used optimally during subsequent processing steps.
During Image Preparation, the following operations can potentially take place:
removing distortion → based on the distortion model parameters stored in the orientation data.
writing of Images in MRF (Meta Raster Format) → This ensures faster access to image content, accelerating various processing steps.
generating Image Pyramids → stored internally in the image files, accelerating various processing steps.
The results of the Image Preparation step are the prepared images stored inside Internal/Images folder or Network Image Directory depending on the project setup.
If none of the operations in the Image Preparation step are necessary, because the conditions are already met, the Image Preparation step is skipped entirely, saving processing time and disk storage.
To skip the Image Preparation step, the Input Images must meet the following conditions:
undistorted → The information that the images don’t contain any distortion is read from the orientation data.
Tiled Tiff or MRF→ E.g. 256 x 256 pixels blocks
Contain pyramids that have been generated by compatible software (Match AT / SURE). The pyramids may be either internal or stored in separate files (*.pyr).
SURE will automatically check and decide for each image, whether preparation is necessary. Additionally, SURE will prepare all the images (regardless of their condition), when Network Optimized Image Preparation (see below) is enabled.
Network Optimized Image Preparation
Network Optimized Images are 8 bit compressed images stored as MRFs. Using Network Optimized Images helps reducing the storage needed for images besides faster image handling. This option is enabled by default for Distributed Processing and can be disabled.
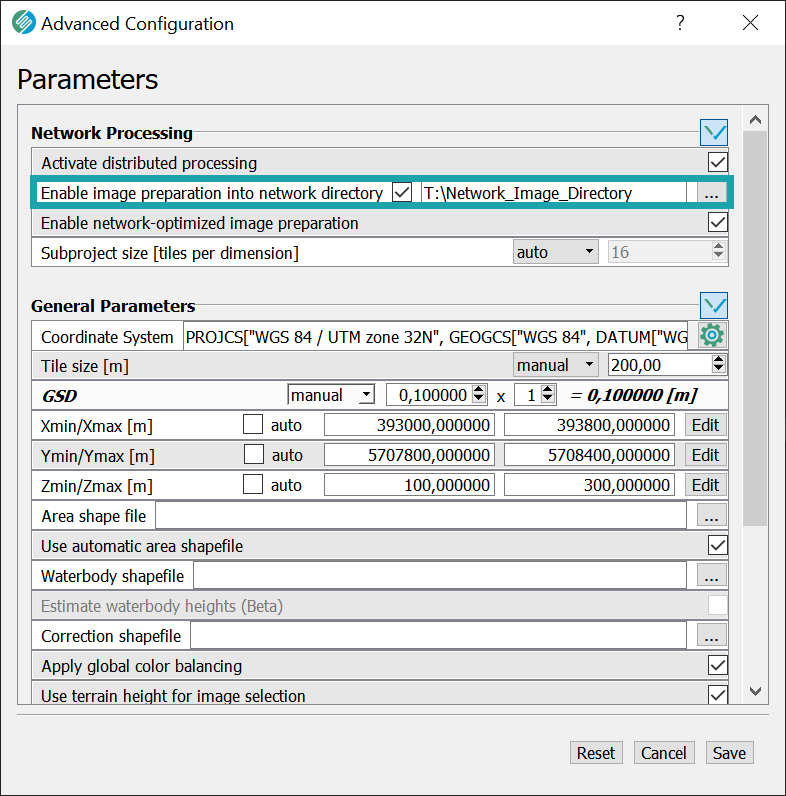
Network Optimized Image Preparation can be activated in the Advanced Configuration panel or with flags when using the CLI:
--network-optimized-image-preparation      Force preparation of all images as 8 bit MRFs
                                           with compression to optimize file transfer.
                                           (default for --distributed-processing)
--no-network-optimized-image-preparation   Prepare images only if necessary and in
                                           original bit depth. (default for
                                           --no-distributed-processing)
Network Image Directory
Network Image Directory is a location where prepared images will be written for each project where it is enabled. This directory can be set once as default and will be used for all the future projects, unless it is changed.
SURE will create a folder for each project in this directory. The created folders will be named with time stamp of project creation and the project name. This is to prevent overwriting images from another project (i.e., if the projects have the same name).
The Network Image Directory is a required argument for Distributed Processing. It's use is optional for non-distributed processing project setups. The Network Image Directory can be set to a directory on a Network Attached Storage (NAS), an online location (e.g., cloud storage solutions, ftp), or on the local drive of a computer. All the nodes should have access to this location for a successful Distributed Processing.
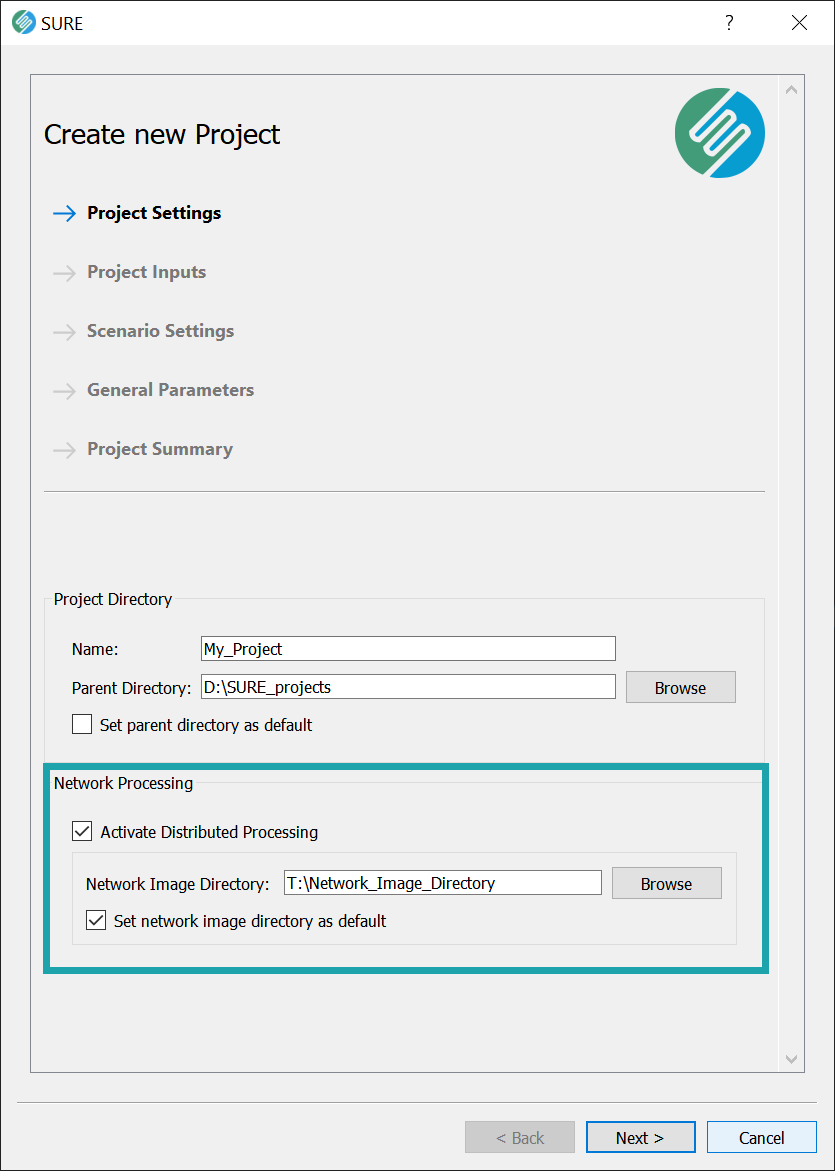
Either in the Project Configuration wizard when Distributed Processing is active:
Or under Advanced Configuration. For project setups without Distributed Processing, this option is available only under Advanced Configuration:
Using the CLI, the Network Image Directory has to be specified for each project; a default path cannot be set. The --network-image-directory is also available as an optional CLI argument for SURE-Node.exe.
--network-image-directory <path>   The network location (absolute path) where images
                                   will be prepared to. In case of cloud processing
                                   this can be a GDAL virtual file system path.
                                   (required if --distributed-processing)
Raster Proxy Files
Use of network image directory enables using raster proxy files. The proxy files are just small text files containing some basic information about the original images (which are located under the network image directory). Therefore, when a network image directory is used, the project (whether distributed processing or not) will generate raster proxy files and cache the parts of the images on demand. The main advantage of using proxy files can be observed for Distributed Processing: the nodes start processing once they receive their project files, which do not include images.
Behavior in Distributed Processing
In Distributed Processing setups, users should pay attention to the Network Image Directory handling of the Nodes. The Nodes will follow this for the image paths:
If the Network Image Directory is passed as an argument, the node will update the input image paths accordingly. Please beware both arguments passed to the Node and the Master must refer to the same directory.
If the argument is not set for the Node, the Node will look for the default Network Image Directory from its own SURE settings. Then the Node will update the paths as mentioned above.
If both of the above are not set, the Node will assume image paths are accessible without any changes.
In all the cases, the Master and the Nodes assume they are authorized to access to the paths.
See more information at Scaling Production with Distributed Processing .
Cloud Storage as Network Image Directory
SURE allows Amazon S3 or Microsoft Azure Blob Storage to be used as Network Image Directory in a Distributed Processing project.
During Image Preparation, SURE automatically uploads the images to the cloud storage configured as Network Image Directory.
Best Practice
Use Input Images with high texture quality.
If available, use uncompressed images (16 bit or 8 bit per channel) as input with Network Optimized Image Preparation. In general, avoid using strongly compressed Images.
For Distributed Processing, use a NAS for Network Image Directory. Make sure all the computers can access the NAS.
Avoid underexposure to achieve a good signal to noise ratio in the image.
Images can be very lightly denoised and sharpened. However, the operation should not remove signal in the texture on the pixel level. Color, brightness and contrast adjustments do not affect the matching result negatively.
Use Input Images that don’t require Preparation in the case of local (non-Distributed Processing) Projects. This will reduce processing time and disk storage. In this case, please store the Input Images on fast access devices (e.g. RAID SSD), to achieve the best performance.
For Distributed Processing Projects we recommend to rely on our Network Optimized Image Preparation.
See more information at Production with SURE - Best Practices