Waterbody enhancement using shapefiles
Strong reflections and changing appearance due to its moving surface prohibit the accurate reconstruction of waterbodies from images employing stereo vision methods.
In order to acquire the highest quality True Orthos and Meshes, SURE software provides the possibility to crop & replace sparse and noisy data generated on water bodies with smooth data interpolated from 2D and 3D polygons. These polygons can be specified in terms of shapefiles (e.g. along coastlines, lakes, rivers, etc.), where each polygon vertex also has an attached/approximated height value (z coordinate). During the DSM's interpolation stage and/or Cloud Filter processes the specified polygons will be applied to either the raw DSM or the raw Dense Clouds on-the-fly, leading to enhanced 2.5D and 3D surface models. Note that the raw DSM and dense clouds themselves will remain unaltered by this process.
Follow these easy steps to enhance your surface models by applying water body polygons:
Step 1 - digitize waterbody polygons
In case shape files containing 3D polygons in the required format are already existing you can skip this step and directly move on to step 2. Otherwise, in order to digitize the 3D polygons, use any available data source, e.g.
digital terrain models (DTM)
LiDAR data
DSM or True Ortho data from previous projects
and capture the polygons along coastlines, lakes, and river shores using your preferred GIS tool.
If no data is available in order to digitize the polygons, proceed as follows:
Set up your project with SURE as usual, disregarding the waterbody polygons. See our Project Configuration article for further information.
Process your project up until the DSM stage is finished.
Use the produced DSMs (representing height). The QA layers which can optionally be produced by SURE can be beneficial for the digitizing process, for example, the binary mask and the DSM_Point_Color (colorized TIFFs) in order to digitize the required waterbody polygons.
Continue with step 2 and use either the 2.5D Tool or the command line Modules to generate the enhanced surface models and True Orthos.

Shapefile coordinate system
The waterbody shapefile, should have defined the same coordinate system as the one used throughout your SURE project. See also the related article about WKT format specification.
2D Waterbody Shapefiles - automatic height estimation
SURE can approximate the heights of a 2D waterbody shapefile during the Analysis step. The user has only to check the option of Approximate waterbody heights during the project parametrization and import a 2D waterbody shapefile.
Single shapefile
You can only specify one shapefile (.shp) that contains all relevant polygons for your entire project. This shapefile, however, can contain multiple polygons within a single layer.
Step 2 - apply waterbody polygons
Either you already processed the dense matching clouds in the previous step 1 or you're setting up the project from scratch, you can use both the graphical user interface (GUI) and the command line interface (CLI) to apply the waterbody polygons defined in a shapefile.
Using the GUI
If you're setting up a SURE project from scratch (Analysis and Dense yet to be processed) and a shapefile containing water polygons is already available, specify the path to the shapefile among the Key Parameters during project configuration.
If the dense clouds and/or DSMs have been processed already, either reset & reprocess the DSM stage or use the 2.5D Tool to reprocess the existing data together with the polygons:
If available, open your existing SURE project in the GUI.
From the program's menu bar, choose "Tools" > "2.5D Tool"
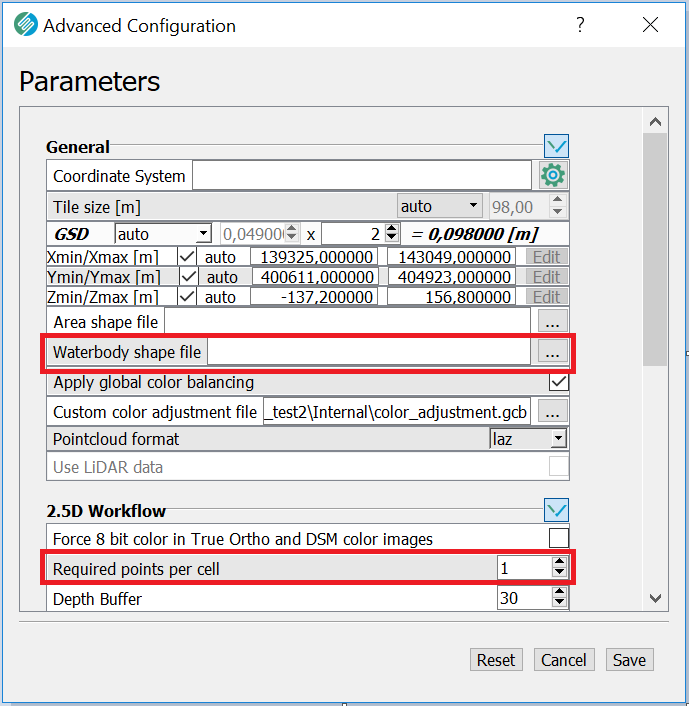
Apart from specifying the waterbody shapefile, adjust parametrization as required, e.g. specify
ground sampling distance (GSD)
tile size
area (ROI)
In case you're processing already rasterized DSM clouds, additionally
reduce the number of Required points per cell from the 2.5D workflow parameters to 1.
Using the CLI
If shapefiles containing the waterbodies are already available, use SURE's command-line interface like this:
SURE.exe -i ... -o ... --scenario ... --waterbody-shapefile <path>
Otherwise, if you need to produce data in order to digitize the polygons still, first process the DSM stage separately, e.g. like this:
SURE.exe -i ... -o ... --scenario ... --dsm --no-true-ortho --no-mesh...
and use the standalone modules to apply the digitized polygons to the already existing DSM:
ModuleDsm.exe --point-cloud-raw <path-to-DSM_RAW-las-folder> --waterbody-shapefile <path>ModulePointCloud.exe --waterbody-shapefile <path-to-shapefile>
Affected results
During the 2.5D workflow (DSM, True Ortho, DSM Mesh), the waterbody polygons will be applied to the raw DSM on-the-fly, so the raw DSM point clouds themselves will remain unaltered by this process. The interpolated areas inside the waterbody will be noticed in the final products stored in the Results folder.